Monday, April 16, 2012

Buddha!

Step 1: Sculpt Buddha from clay 

 
: Create a blanket mold- I achieved this by tightly wrapping my clay sculpted Buddha in saran wrap. Then rolling out  1/4'' clay wall to build around contouring the saran wrapped Buddha. Next, splitting the Buddha into four sections by another 1/4'' clay wall (which is what you can see dividing the plaster mold below).  I then plastered each section taking out the second clay walls as the plaster dried. After the plater mold was completed, I took the mold apart, removed the saran wrap and the rest of the clay walls  from the original sculpted Buddha. Placed only the plaster mold back together over the original clay Buddha and tightened it with rubber ties. I filled in the cracks with clay to seal it from the next step of pouring liquid silicon. Drilled a hole about an inch and half through the top of the mold to pour the silicone. Let dry over night. The next day took the mold apart, carved out the clay, put the mold back together with only the silicone and plaster parts. Tied with rubber ties, the placed upside down in a bucket. Melted the brown wax, and poured the wax in the silicone mold for fifteen minutes, then poured it back out letting a thin wax wall left inside the mold. After cooling I patched up and holes in the wax and took it carefully out of the plaster/silicone mold. 


The Next process is to sprue up the two halves of wax that I cut.
After the two halves are sprued up, the next step is to dip them into the ceramic mixer to make a ceramic shell. This is done many times, some with fine and corse sands to build up the shell.


After hardening the shell, the end of the shell must be cut off with a chop saw, then burn out the paper cup to expose the wax sprue, which is then put into a kiln to melt the wax out of the ceramic shell. 
All the while the bronze is in it's own kiln heating up to molten degrease 

The sand pits are prepared with the ceramic shells (after the wax has been emptied) 
Then we suite up in loge sleeved clothing, hard leather boots, leather aprons, leather jackets, fire proof shin guards, and foot coverings, bandanna gloves, and face shield.

After the pour the shell is filled with bronze and taken out of the sand pits to cool

Busted away the ceramic shell
Next step is to cut off the sprue and clean up the bronze and piece the Buddha back together again!

 Then buff the uneven milky surface of the bronze off and file down the seam


last step is to wax seal the bronze 

Monday, February 6, 2012

Project: Redefining the Chair


Some motivation from other artists

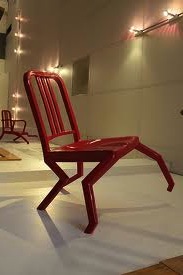
I found the red chair above, that is walking, to be very intriguing. I enjoy the movement and awkwardness of the legs.. I also like the organic melting of the chairs, the oozyness is an edgy form that could be pushed a multitude of ways.


-Step 1, find a chair: antique mall $15.00

-wonder through Lowes to find the best supplies


                -Destroy seat and take apart entire chair

-Don't forget to smile this is the fun part
  

-reassemble pieces of the old chair to make new legs and seat

-use new wood to make horn like back rests


-Attach pieces 

        -next step, chicken wire cape base


-Attach chicken wire with staple gun
-cut a million burlap strips and dip in plaster like paper mache, cover entire chicken wire base


-prime, very important


-paint, paint again

-oh and one more coat of red paint

-stain wood, and complete!

Overall, I really enjoyed creating my chair. The project being to redefine the chair,  in my opinion was a success from my starting sketch. Would you know my piece was once a real chair? maybe, but it no longer functions as such. For, what was once a boring necessity is now living art. My piece is about the struggles and burdens (the red cape) that I and everyone faces, the legs are struggling to walk with such weight on its shoulders. The horns are the fight that everyone instinctually has to keep carrying onward through life's challenges.


Friday, December 9, 2011

Closure on the Twister

Disaster struck Thursday, my weakness for building with wood has been brought to the surface. As I was drilling the final platform to my sculpture...SNAP! All my calculations have been busted! With the help of my teacher whom heard the whole thing go down, ran to the rescue drilling boards back to gather as fast as he could. I was so struck and flustered I forgot to thank him..... Thank you Matt! Plan B is now in effect. My sculpture is now a delicate disaster. I don't have the time or the energy to start over, so sacrificing some of the visual appeal is a must happen situation. I have made, what I call a crutch, to the back side of the third platform in order to allow my piece to stand on its own. This crutch is still unstable so further adjusting is going to happen soon. Deciding I needed it, I called for help, my right hand man showed up to help me coat my piece with primer in the freezing cold. This weekend I will finish it off with a coat of light matte gray. Overall I'm pretty sure I have had the help of almost everyone in my class, this project was a huge learning curve for me, but I do love a challenge. I most certainly feel I could now create a more successful wood sculpture in the future.

Morgan and I posing with in my opinion the hardest tool to use, the dreaded drill!
The finished work!


Tuesday, December 6, 2011

Memory lane, goal 5' and 6"

End of the semester approaching and the pressure is on to complete the final assignment. Our set goal is to create a rendered sculpture from wood, meaning I would have to learn the ways of the power tools. Our work is depicting a past memory, and to take that memory and recreate it's story through distorting any realistic figures, or basically any nouns from being obviously visible. Like in my title, five feet and six inches marks completion, (or sleep) for the assignment calls for one dimension to be at least our bodies height.
Feeling out of my element, I had a few failed beginnings, but have found my way on track. Or at least for now I feel that way. Learning the tools of the wood workers has been by biggest challenge, I have seen my father and brother use them my entire life, but never dreamed I would actually be behind a chop saw slicing through eight foot two-by-fours. I'm feeling more confident now that I finally conquered the power drill. Recalculating my measurement and grasping a better understanding of how wood can be sculpted I have come up with a plan. My piece will depict an abstracted tornado, with swirling winds and threatening bends of energy. My piece sets on three one-foot vertical beams resembling the loose gap tornados seem to have between the ground and it's funneled foot. Then, a platform made from 49 degree triangles glued, nailed, and tightened together into a windmill type pattern are thus glued and nailed to the vertical beams.  Following is another set of beams but are cut with a 48 degree slant and are rotated to begin the tornado's first tight bend. This process is carried out five more times with altering bends and similar but gradually enlarging platforms of windmill like patterns. Ultimately, I am planning on painting my tornado with a solid matte finish. The details to be continued.